Tutorial - Twitch-Style Host Dashboard
Use this tutorial when your product is host-first and needs moderation, requests, and recording controls in one workspace.
Outcome
By the end, you will have:
- a production-safe host join and room control boundary
- a dashboard-style host shell around MediaSFU runtime logic
- a clear split between runtime workflow and UI composition
Visual target
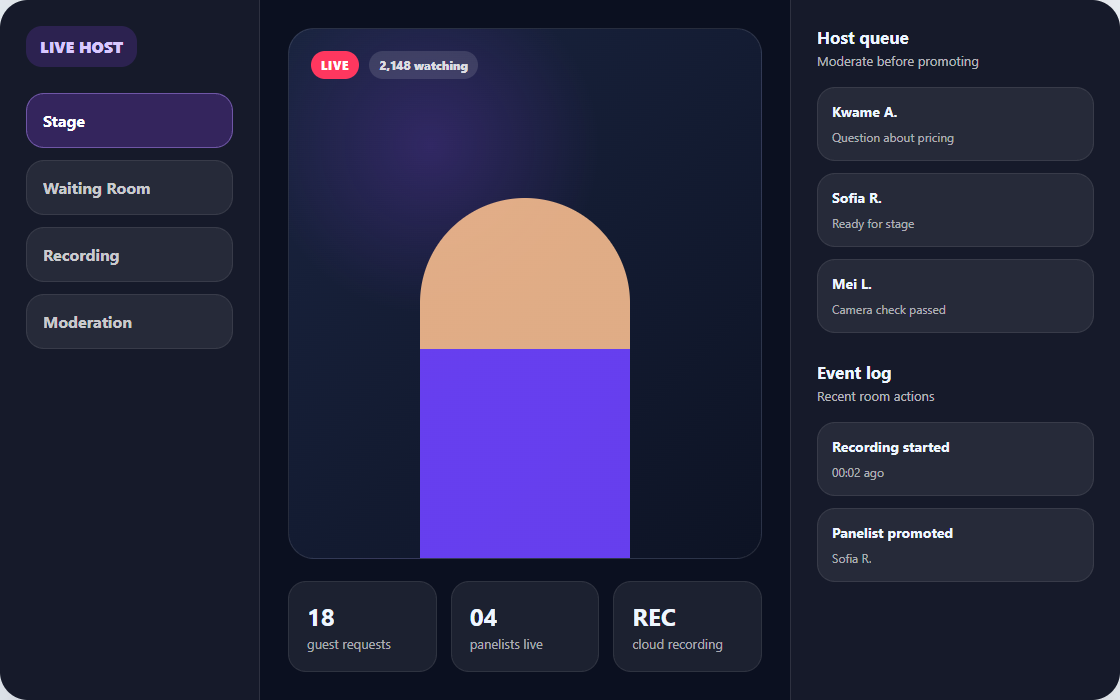
Use this as the first layout target: a persistent host sidebar, a large stage region, live moderation controls, recording status, and a right-side queue. MediaSFU should continue to own room state and workflow while your host dashboard owns presentation.
Scope and assumptions
This tutorial assumes:
- your secure backend create and join flow already works
- you understand basic room join behavior
- you now need stronger host tooling than a default room shell
Read this before starting:
- Choose your UI mode
- Secure backend proxy
- Build style guide
- Custom component replacement
- Media lifecycle
Step 1: Decide your integration depth
For most teams, start with:
- framework SDK plus
customComponent
Use Headless mode only when you need a fully bespoke shell from the first visible screen.
Two valid angles for the same product shape
This tutorial's main implementation uses returnUI={true} with customComponent, but the same host dashboard can also be built with returnUI={false}.
| Angle | What you keep | Use it when |
|---|---|---|
returnUI={true} + customComponent | MediaSFU entry flow and runtime shell, with your dashboard rendered as the visible workspace | You want a custom host dashboard without taking ownership of every visible step from first paint. |
returnUI={false} + headless shell | Your own dashboard mounted next to a headless MediaSFU instance via sourceParameters | You want zero stock room UI visible and need app-level routing, panels, or shell behavior around the host workspace. |
Headless angle for this same dashboard:
<>
  <MediasfuGeneric
    connectMediaSFU={true}
    returnUI={false}
    noUIPreJoinOptions={noUIPreJoinOptions}
    sourceParameters={sourceParameters}
    updateSourceParameters={setSourceParameters}
    createMediaSFURoom={createMediaSFURoom}
    joinMediaSFURoom={joinMediaSFURoom}
  />
  <TwitchHostDashboard parameters={sourceParameters} />
</>
Choose the true angle when your dashboard mainly replaces the main room surface. Choose the false angle when the rest of your app shell, moderation layout, or navigation stack must stay fully app-owned. The Tutorial - Support AI Console page shows the headless wiring pattern in more detail.
Step 2: Define host dashboard regions
A practical first layout uses four regions:
- stage region for active speaker or stream focus
- moderation queue for requests and admissions
- host control panel for permissions, recording, and room actions
- chat or event log panel for live state and interaction
Keep runtime actions connected to MediaSFU helpers and state.
Copy/paste starter: React host dashboard shell
Drop this into a React app after installing mediasfu-reactjs. It replaces the visible room shell with a host dashboard while MediaSFU keeps managing the room workflow.
Create src/TwitchStyleHostRoom.tsx, paste the component below, and keep your backend /api/mediasfu/create-room and /api/mediasfu/join-room routes forwarding to the same upstream MediaSFU Cloud rooms URL from Secure backend proxy.
import { useMemo } from 'react';
import {
  MediasfuGeneric,
  type CreateMediaSFURoomOptions,
  type JoinMediaSFURoomOptions,
} from 'mediasfu-reactjs';

type RoomResult = {
  data: Record<string, unknown> | null;
  success: boolean;
};

async function createMediaSFURoom({ payload }: { payload: CreateMediaSFURoomOptions }): Promise<RoomResult> {
  const response = await fetch('/api/mediasfu/create-room', {
    method: 'POST',
    headers: { 'Content-Type': 'application/json' },
    body: JSON.stringify(payload),
  });

  return { data: await response.json(), success: response.ok };
}

async function joinMediaSFURoom({ payload }: { payload: JoinMediaSFURoomOptions }): Promise<RoomResult> {
  const response = await fetch('/api/mediasfu/join-room', {
    method: 'POST',
    headers: { 'Content-Type': 'application/json' },
    body: JSON.stringify(payload),
  });

  return { data: await response.json(), success: response.ok };
}

function TwitchHostDashboard({ parameters }: { parameters: any }) {
  const participants = parameters.participants ?? [];
  const waitingList = parameters.waitingList ?? [];
  const requests = parameters.requests ?? [];

  return (
    <main style={{ minHeight: '100vh', display: 'grid', gridTemplateColumns: '1fr 340px', background: '#111827', color: '#f9fafb' }}>
      <section style={{ padding: 24, display: 'grid', gap: 16 }}>
        <div style={{ minHeight: 360, borderRadius: 8, background: '#020617', display: 'grid', placeItems: 'center' }}>
          <div style={{ textAlign: 'center' }}>
            <h1 style={{ margin: 0 }}>Live stage</h1>
            <p>{parameters.roomName ?? 'Room connecting...'}</p>
          </div>
        </div>

        <div style={{ display: 'flex', gap: 12, flexWrap: 'wrap' }}>
          <button onClick={() => parameters.clickVideo?.({ parameters })}>Toggle camera</button>
          <button onClick={() => parameters.clickAudio?.({ parameters })}>Toggle mic</button>
          <button onClick={() => parameters.clickScreenShare?.({ parameters })}>Share screen</button>
          <button onClick={() => parameters.launchRecording?.({ parameters })}>Recording</button>
        </div>
      </section>

      <aside style={{ borderLeft: '1px solid #334155', padding: 20, display: 'grid', gap: 20, alignContent: 'start' }}>
        <section>
          <h2>Participants</h2>
          <p>{participants.length} connected</p>
        </section>

        <section>
          <h2>Waiting room</h2>
          <p>{waitingList.length} waiting</p>
        </section>

        <section>
          <h2>Requests</h2>
          <p>{requests.length} open requests</p>
        </section>
      </aside>
    </main>
  );
}

export function TwitchStyleHostRoom() {
  const noUIPreJoinOptions = useMemo(
    () => ({
      action: 'create',
      eventType: 'webinar',
      userName: 'Host',
      capacity: 100,
      duration: 120,
    }),
    []
  );

  return (
    <MediasfuGeneric
      connectMediaSFU={true}
      returnUI={true}
      noUIPreJoinOptions={noUIPreJoinOptions}
      createMediaSFURoom={createMediaSFURoom}
      joinMediaSFURoom={joinMediaSFURoom}
      customComponent={TwitchHostDashboard}
    />
  );
}
Render it from your app entry:
import { TwitchStyleHostRoom } from './TwitchStyleHostRoom';

export default function App() {
  return <TwitchStyleHostRoom />;
}
What you should see first:
- a stage region for the host view
- a right-side dashboard for participants, waiting room, and requests
- host actions still routed through MediaSFU runtime helpers
The inline buttons in this starter are intentionally low-level. In customComponent, parameters is the live MediaSFU helper bundle: room state, modal togglers, and action helpers all travel through it. Use direct calls like clickVideo or clickAudio for simple toggles, but do not assume every surface must be rebuilt this way.
Recording is usually better handled by importing RecordingModal or ModernRecordingModal, or by restyling uiOverrides.recordingModal, while keeping the stock MediaSFU flow underneath. Read Custom component replacement, Media lifecycle, and UI overrides before polishing the control bar.
Step 3: Implement host-critical flows first
Prioritize these flows before visual polish:
- host can create and join securely
- host can admit or reject requests
- host can mute or control role-sensitive actions
- host can start and stop recording
- host sees reliable participant and room state changes
Step 4: Add lifecycle-aware media controls
As the dashboard grows, keep produce and consume behavior explicit:
- stage render rules
- participant card promotion and demotion
- active-speaker and pinned layouts
- fallback behavior when streams drop
Reference:
Step 5: Validate the live room behavior
Before launch:
- test request and permission flows with multiple roles
- test recording transitions under reconnect conditions
- test participant churn and stage reassignment
- test host controls under packet loss and latency
When to move lower than UI SDKs
Move to mediasfu-shared only when:
- your dashboard needs lower-level runtime hooks that UI SDK helpers do not expose cleanly
- your team is building its own wrapper layer across frameworks
If your existing host dashboard works with customComponent, stay there.
What to build next
After this tutorial is stable:
- Add translation and subtitle workflows.
- Add whiteboard or screenboard synchronization where needed.
- Add AI or support-console escalation patterns if your product direction requires it.